Modifying & Creating Reports
Virtual TimeClock Pro and Network editions include over a dozen built-in reports that can be easily modified with the Report Writer tool. The Report Writer is a powerful tool that controls what information is displayed on each report and allows you to modify the included reports and create your own custom reports. This article will explain how to use the Report Writer to get the most out of your time clock reporting.
Note: If you need to run a report for certain people or for a specific date range, use the People & Dates option in the toolbar of your report. Changes in the Report Writer are global and are applied every time the report is opened.
Modifying an Existing Report
Follow these steps to modify an existing report in Virtual TimeClock:
- Select Turn Administration On from the File menu.
- Choose Report Writer from the Configure menu.
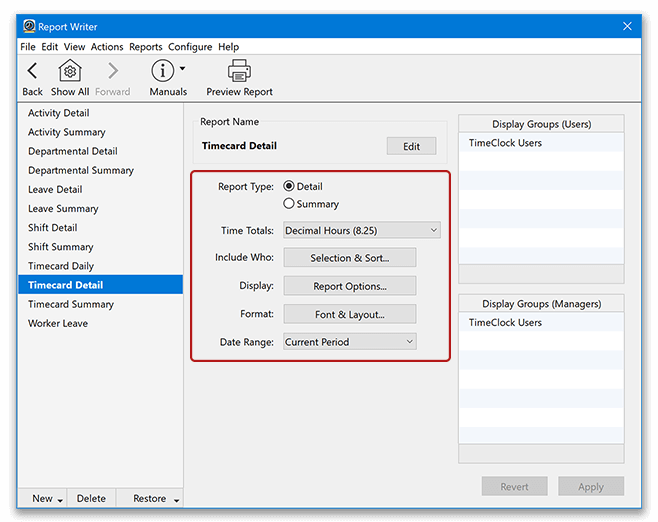
- Select the report you want to modify from the report list.
- Use the report settings to make any needed changes.
- Preview the modified report with the Preview Report button in the toolbar.
- Click Apply to save.
Creating a New Custom Report
Follow these steps to create a new custom report:
- Select Turn Administration On from the File menu.
- Choose Report Writer from the Configure menu.
- At the bottom of the report list, select Add then New Report.
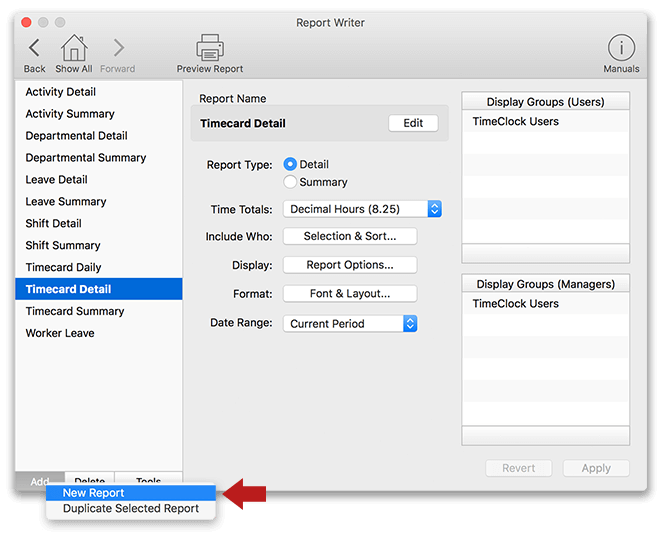
- After naming your report, use the report settings to customize your new report.
Note: For detailed information about each setting, review the Report Settings & Options section of this article.
- Preview your new report with the Preview Report button in the toolbar.
- Click Apply to save.
Restoring Report Defaults
If you accidentally delete one of the default reports or you want to restore reports to their factory settings, follow these steps:
- Select Turn Administration On from the File menu.
- Choose Report Writer from the Configure menu.
- At the bottom of the report list, select Tools and choose Restore Default Reports.
Note: Any default reports that you have customized will be reset. Use in case of emergency and with discretion.
Report Settings & Options
This section will provide a detailed explanation of the Report Writer settings and options.
Report Type
The two options for report styles are a detailed and summarized report.
- Detail Report: A detailed report will bring up every start and stop time for the date range selected. A Detail report can also include breaks/lunches, activities, and overtime. This report includes an abundance of information in detail form.
- Summary Report: This is a high-level overview that provides a condensed version of report information at a glance. The report highlights the total hours and leaves out the details of start and stop times. Use this style if you want a simple and clean overview of hours worked by employees during a time period.
Time Totals
The Time Totals setting allows you to decide how time will be displayed on reports. The options are Decimal Hours and Hours & Minutes. A colon (:) separator between the hours and minutes (e.g. 7:30) indicates hours & decimals while a single period (.) separating the decimal hours (e.g. 8.25) indicates decimal hours. Review the Decimal Hours vs Hours & Minutes article for more information.
Note: Hours & Minutes are for viewing purposes only and cannot be used to calculate wage.
Selection & Sort
The Selection & Sort window allows you to determine how information is displayed on your report.
- Group By: The options are activities, departments, leave, person, and even shift. An example of this is grouping data by activity to track job #’s or classroom numbers. You could also group by person to view all data for each user in one place.
- Who: Once your data is grouped you can decide who will be included on your report. The options are everyone, departments, or selected people.
- Sort By: The default is Last Name, First, but can be changed to First & Last Name.
- Entries: Here you can decide what entries you want to see. The options are as follows: Include All, Select Activities, Select Shifts, or Select Leave. This makes it super simple to view how employee's time is tracked.
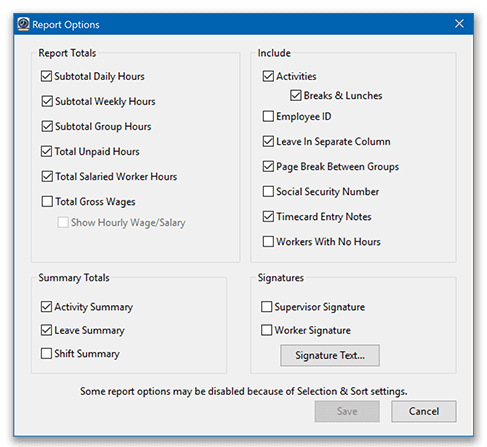
Report Options
Report Options gives you access to everything that can be displayed on a report. You can review the default settings and make changes depending on what you want to include on reports.
Report Totals
- You have the choice to include hours subtotaled and totaled for daily, weekly, or separated by group. Unpaid hours can also be totaled to track time for lunch or unpaid activities.
- By default salaried worker hours are not included on reports, but they can be included with the Salaried Workers option. By including salaried employees you can see if they took a shorter day or are putting in a lot of extra hours one week versus another. To track salary worker hours on reports, confirm that users are set to Salary in the Employment tab of the Configure Users window.
Summary Totals
- Activity, Leave, and Shift summaries can be included on most reports to give a high-level summary of how hours were spent. This gives you a quick snapshot of the total hours for the selected summary total option.
Include
- Activities: Including activities as well as breaks and lunches is available on most detail reports. This is a great option for tracking billable hours for projects and to see how hours are spent throughout the day.
- Employee ID and Social Security Number: You can have employees' social security number or employee ID displayed on the report for easy reference.
- Page Break Between Groups: This setting adds a page break for groups and users. This is commonly used so that each user timecard begins on a new page.
- Timecard Entry Notes: User entry notes can be included on timecards for both employees and administrators to view. Find out more about Entry Notes.
- Workers With No Hours: Choose if you want to include workers with no hours on reports.
Signatures
- You can choose to include a supervisor or worker signature line on reports if necessary. You can even edit the signature text at the bottom of the reports if you wish. Learn more in the Timecard Signature Options article.
Font & Layout
We make reports easy-to-read with default settings, but there are several display settings you can change, including: font, font size, margins, spacing, and orientation.
Date Range
The default date range for reports is the current payroll period, but can be customized to the date range of your choice. Remember, the date range you choose will be the displayed date range every time this report is generated. If you want to change the date momentarily to view a historical record, do not use the date range setting. Instead, open the desired report from the My Reports menu and use the People & Dates option to change the date.
Assigning Reports
All reports are available for time clock administrators. Review the Reports for Groups Knowledge Base article for more information about assigning reports to users and managers.