Setup Guide – Virtual TimeClock Network
This full setup guide will help you get your Virtual TimeClock software completely set up for use at your company. This guide will cover both necessary and optional features, allowing you to skip any features you do not wish to use.
This guide assumes that you have already installed Virtual TimeClock Server and Pro Client software, and have connected the Virtual TimeClock Pro Client to your TimeClock Server. See the Network Edition Installation Guide for more information.
Important Note: In Virtual TimeClock, User Mode allows employees to clock in/out and view their own timecard. Administration Mode allows you to modify entries, print payroll reports and access other administrative functions. You can Turn Administration On or Off from the File menu at any time. If you don't remember your administrator password, please contact Technical Support for assistance.
1. Add Users
When you connect to your TimeClock Server, your first option will be to Add Users. If you close this prompt and return to the program later, review the Adding Users article.
Note: Free trials are limited to 300 time clock entries so we recommend limiting time clock use to 2 or 3 employees to get the most out of your trial.
2. Display Groups
Display groups provide a simple way to view and manage groups of users. Display Groups can be used to customize the timeclock interface, apply time clock rules to a groups of workers, assign managers and more. For detailed information on setting up display groups, see the Overview of Display Groups article.
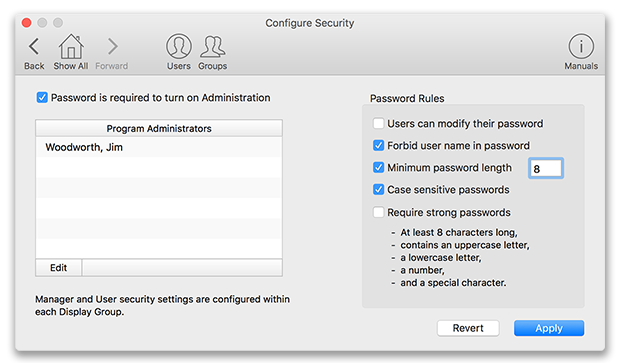
3. Security & Passwords
In Virtual TimeClock, passwords can be used to help prevent buddy punching while also allowing administrators and managers to access administrative functions. See the Overview of Passwords & Security article for detailed information.
4. Overtime Settings
Configuring your overtime settings will ensure that employees are paid properly for all hours worked. Learn more about setting up overtime rules by reading the Overview of Overtime article in our Knowledge Base.
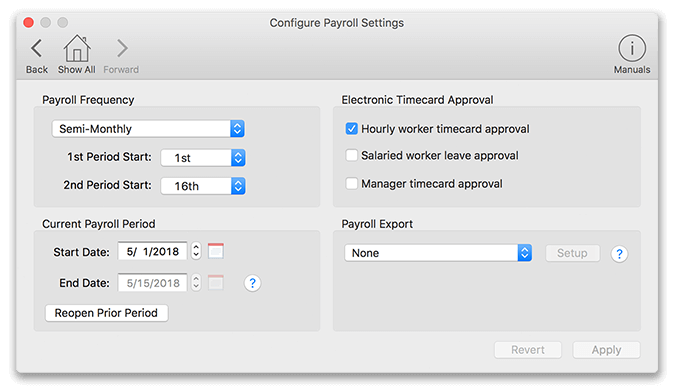
5. Payroll Settings
The TimeClock payroll period defines the date range for timecard totals and reports, and should be matched to your company payroll cycle. Learn more about configuring your payroll period >
6. Time Settings
Time settings allow you to control the timestamp source, time rounding and specific time calculations. Learn more about time rounding and the timestamp source.
7. Assigning Administrators & Managers
Adding administrators or managers allows administrative time clock duties be shared on your team. Find out more about managers and administrators by reading the Overview of Users, Managers and Administrators.
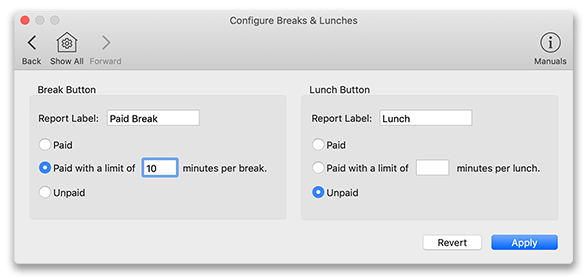
8. Breaks & Lunches
Configuring your break and lunch periods allows you to track paid or unpaid breaks and lunches according to your business practices. Find out how to change break settings in the Configuring Breaks and Lunches article.
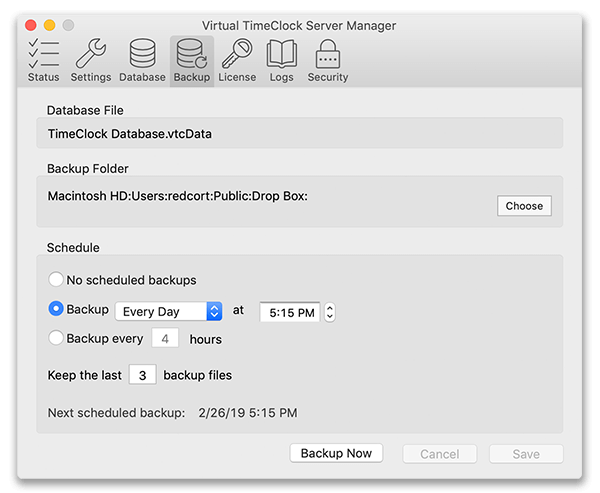
9. Scheduled Backups
The backup feature allows you to schedule automatic backups of your time clock database to the destination of your choice. Learn about Backups >
10. Activities
Activity tracking allows you to categorize, understand and report your labor costs and premiums. Learn about Activity Tracking >
11. Shifts & Schedules
Shifts and schedules allow you to control unwanted overtime by restricting when workers can punch in and out. Learn about Shifts & Schedules >
For additional information about any of the features and functions of Virtual TimeClock, visit our online Knowledge Base.