Payroll Approval – Pro & Network Edition
This article explains the process to review and approve timecards for payroll in Virtual TimeClock Pro and Network edition. See this article to approve payroll in the Basic edition.
Employee/Manager Timecard Review
You have two options if you want employees and/or managers to approve timecard hours before payroll is processed:
1. Print & Sign - Employees and/or managers can review, print and sign timecards.
2. Electronic Approval - Employees and/or managers can approve hours digitally.
Timecard Review & Payroll Approval
The Timecard Review and Payroll Approval window is a powerful dashboard used by an administrator for final review and approval of all timecard hours for payroll.
To open the Timecard Review and Payroll Approval window:
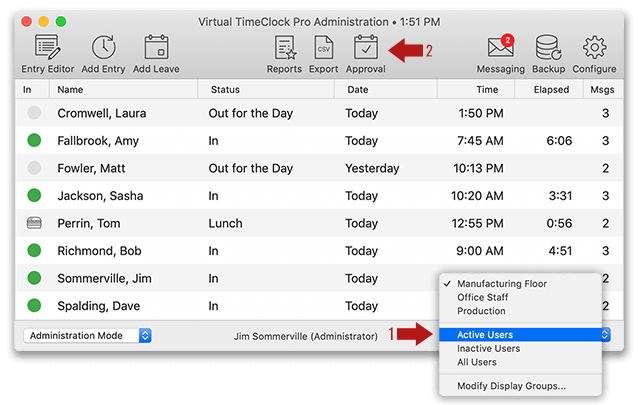
- Select Turn Administration On from the File menu.
- Choose Active Users from the display group popup menu. This ensures that hours from all employees in all groups are included in payroll approval.
- Select Approval in the toolbar. The Timecard Review and Payroll Approval window opens and totals the timecards for all users.
Approve Timecards for Payroll
The payroll review and approval process occurs at the end of the payroll period. This process has up to 4 steps:
1. Review & Approve Hours
Review employee timecard hours for accuracy. Select an employee name and choose View Timecard form the popup menu to view or modify a timecard. After reviewing all timecards, click Sign off All to approve hours for payroll.
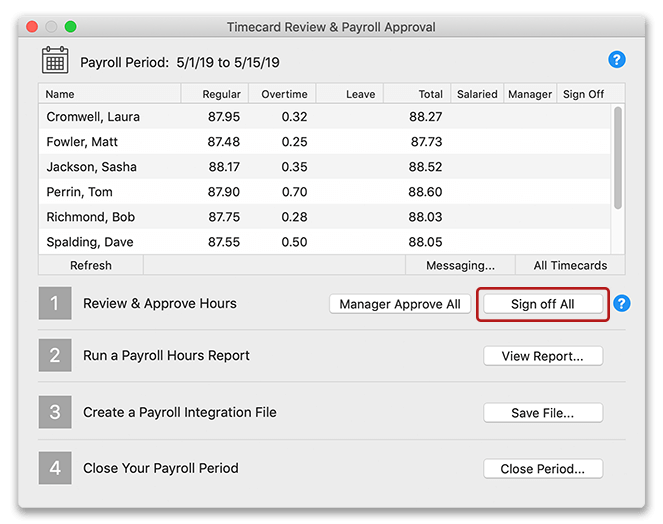
2. Run a Payroll Hours Report
Click the View Report button for a summary of all worker hours for the payroll period. Print or save the report for your records. Use this report if you (or your provider) are manually entering employee hours into your payroll system.
3. Create a Payroll Integration File (Optional)
If you have setup payroll integration, Click the Save File button to create a payroll integration file. You use this file to import your employee hours into your payroll system.
4. Close Your Payroll Period
The final step in the process is closing the payroll period. Closing the payroll period performs two very important functions:
(1) All timecards hours for the current period are written to the database as a permanent, unalterable record.
(2) Virtual TimeClock automatically advances the Current Period dates to your next pay cycle.
Click the Close Period button to close the current payroll period:
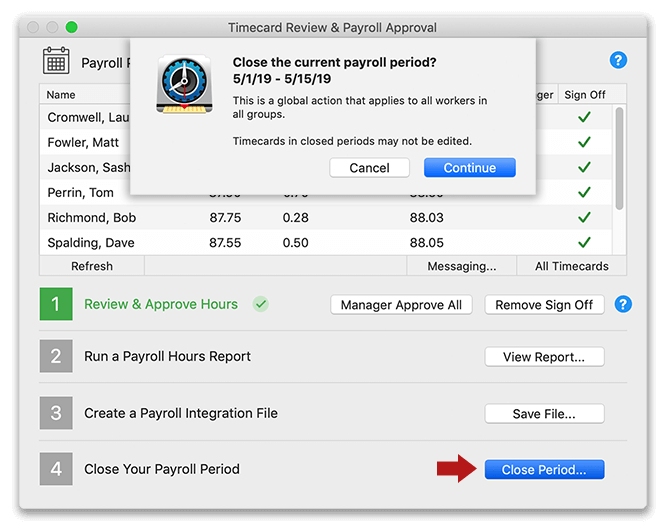
Once a payroll period is closed, the hours in that period cannot be edited without Reopening the Payroll Period.
Tip: If you’ve neglected closing periods, it’s easy to close multiple periods all at once. Simply update your payroll settings to reflect your current payroll period. Virtual TimeClock will automatically total and close all periods up to the new Current Period start date.