Install Virtual TimeClock Network
Installation of the Network Edition includes two programs: the TimeClock Server and one or more TimeClock clients. This article will guide you through installation of both programs.
Note: For tips on choosing a computer to be your TimeClock Server, see the Overview of Network Edition article.
1. Locate your Virtual TimeClock License
When you purchase Virtual TimeClock, a license key and instructions are sent to you via email. If you are reinstalling or need a copy of your license, please contact us.
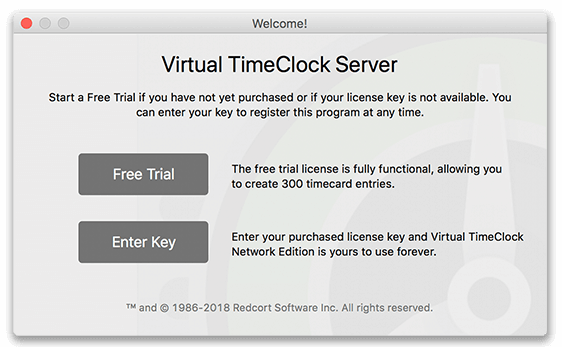
Note: If you have not yet purchased Virtual TimeClock, start a free trial by following the steps below. Learn more about Virtual TimeClock free trials.
2. Install the Virtual TimeClock Server
Before installing the TimeClock Server, you will need to assign a static IP address on the TimeClock Server computer. Contact your IT professional if you need assistance.
- Go to the Network Edition download page and select the Server Manager download. If you have a license key, ensure you download your licensed version.
- Download and run the Virtual TimeClock Server installer.
Windows users will need to be logged in to a full administrator account to properly install the TimeClock Server. During the installation, you will need to select Yes to allow the time clock to make changes to your computer and Unblock/Allow program firewall access.
Apple macOS
In order to install the software you’ll be prompted for the computer’s administrative password.
- Virtual TimeClock Server Manager will launch automatically at the conclusion of the installation. If you have a license, choose Enter Key and fill out your license information or choose Free Trial.
Important: Your TimeClock Server runs in the background, independent from the Server Manager. While the computer must be turned on, the Server Manager application DOES NOT need to be open for normal operation of your TimeClock. Review the Configuring Power Settings article to make sure your TimeClock Server computer does not go to sleep and break connection with TimeClock clients.
- At the Status tab, make note of the Local (TimeClock Server) IP address and port number in the Networking section. Write these numbers down for when you connect your client(s).
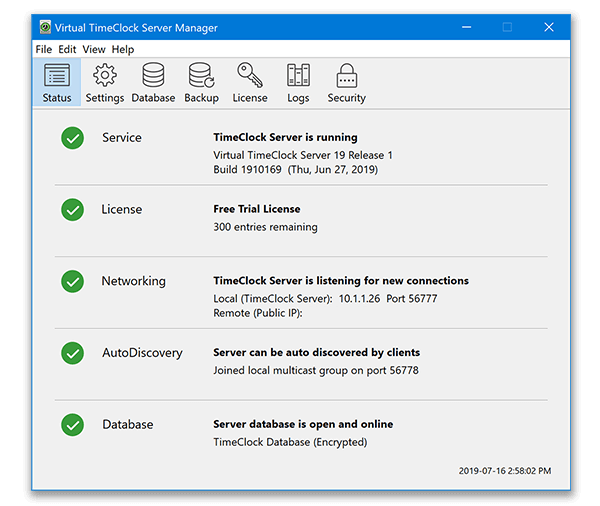
- The final installation step for the TimeClock Server is to open the ports in your firewall.
3. Install Virtual TimeClock Clients
Determine if you want to download a Pro or User Client onto the computer. The User Client only allows employees to punch in and out. The Pro Client allows employees to clock in and out and also includes password protected access to Administrative features. At least one Pro Client is required for administration of the TimeClock.
- Go to the Network Edition download page.
- The clients must be the same version release as the Virtual TimeClock Server (i.e. v19 clients with v19 TimeClock Server).
- Download and run the Virtual TimeClock Client installer.
Microsoft Windows
During the installation, you will need to select Yes to allow the time clock to make changes to your computer and Unblock/Allow program firewall access.
Apple macOS
In order to install the software you’ll be prompted for the computer’s administrative password.
- Virtual TimeClock will launch automatically at the conclusion of the installation. At the Welcome window, you can manually enter the TimeClock Server IP address or click the arrow and choose Search for Servers to search your local network.
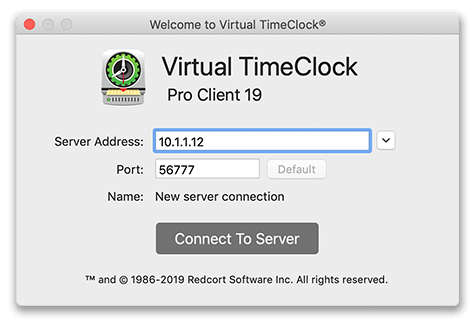
To connect to a server at a different physical location, please refer to our guide for setting up remote (off-site) clients.
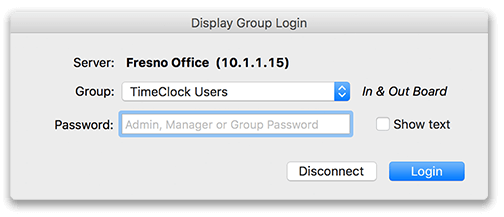
- After selecting your TimeClock Server or manually entering the IP address, click Connect to Server. If you have multiple Display Groups or if passwords are required for login, an additional window will prompt you for this information.
- See our Network Setup guide to configure Virtual TimeClock according to your business needs.