Configuring Power Settings
Most modern computers have a variety of power settings that allow the computer to conserve energy when it’s not being used. Several of these energy saving features will cause a Virtual TimeClock Server computer to stop responding to the TimeClock client computers. The following article will help you properly configure your power settings to ensure uninterrupted communication.
How Power Settings Impact Virtual TimeClock
In Virtual TimeClock Network Edition, all time clock data is stored on one central computer that runs the TimeClock Server program. The TimeClock Server “serves” (stores and distributes) time clock information to each of the individual TimeClock clients, allowing users to punch in, punch out, check timecards, etc. The server to client connection means that when there are disruptions to the TimeClock Server, the clients will lose communication and be unable to perform standard time clock functions.
Configuring Energy & Power Settings
Select your operating system platform below and modify the power settings on the Virtual TimeClock Server computer.
Microsoft Windows 10 & 11 PC
-
- In the bottom Task Bar, select the Windows icon and then select Settings.
- This will open the Settings Window, in this window there will be a search bar, type Control Panel in the search bar and press the Enter Key on your keyboard.
- Select Control Panel from the search results and this will open it in a new window.
- In the Control Panel, select System and Security.
- Under System and Security, select Power Options
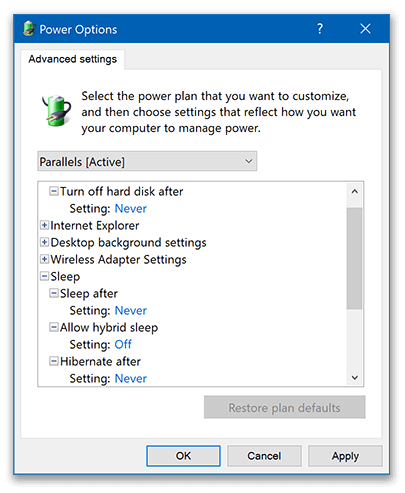
- In the power options window on the left hand side of the window select Change when the computer sleeps.
- Now select Change advanced power settings
- Set the following sleep settings and click Apply:
- Turn off hard drive after _ minutes: Never
- Sleep after _ minutes: Never
- Allow hybrid sleep: Off
- Hibernate after _ minutes: Never
Apple macOS 12 (Monterey) and earlier Computers
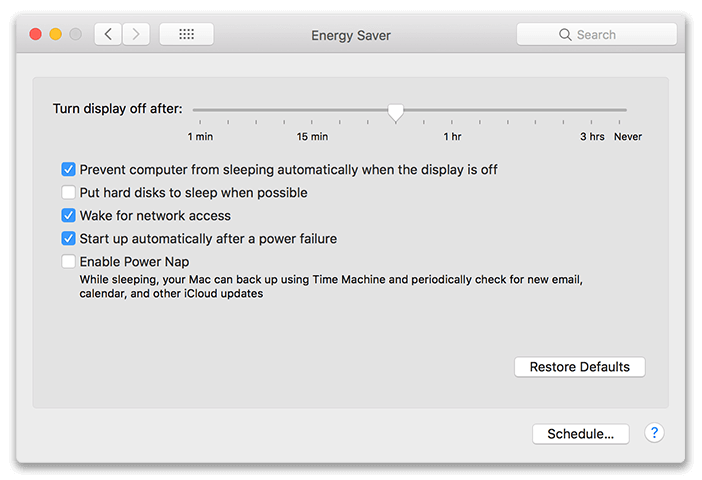
- Select System Preferences from the Apple menu.
- Select the Energy Saver menu item.
- Select Prevent computer from sleeping automatically when the display is off.
- Deselect Put hard disks to sleep when possible.
- Select Wake for network access.
- Select Start up automatically after a power failure.
- Make sure that Enable Power Nap is deselected.
Apple macOS 13 (Ventura) Computers
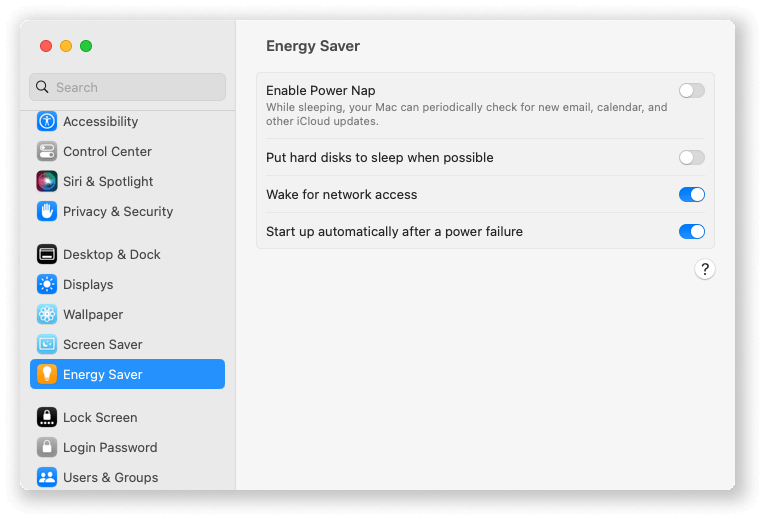
- Select System Preferences from the Apple menu.
- Select the Energy Saver menu item.
- Make sure Enable Power Nap is deselected.
- Deselect Put hard disks to sleep when possible.
- Select Wake for network access.
- Select Start up automatically after a power failure.
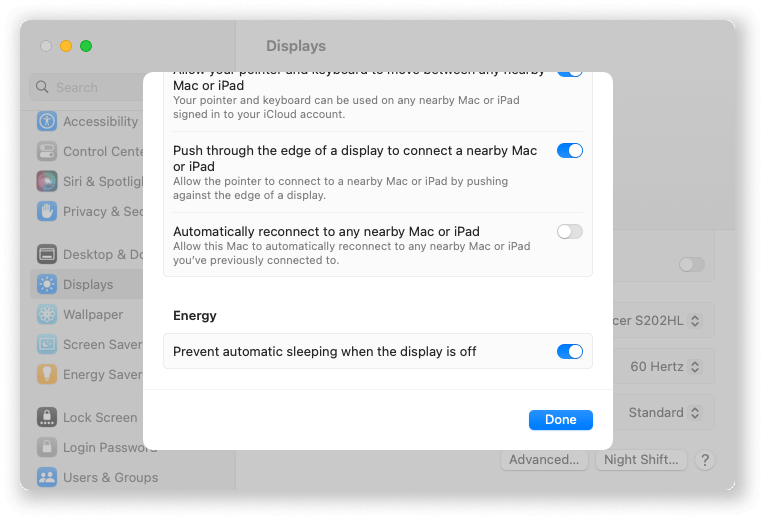
- In the Systems Preferences menu select Displays, this will open the display settings.
- In this window select advanced..., this will pop up a new window.
- At the bottom of this window in the Energy section make sure Prevent automatic sleeping when the display is off is selected.
While the settings above may vary slightly based on particular operating system, it is essential to adjust the power and sleep settings to make sure the TimeClock Server computer does not go to sleep and break communication with the TimeClock Clients.