Adding & Removing Managers
This article explains how to add and remove time clock managers in Virtual TimeClock. A manager is someone who is given permission to manage the time clock for a group of workers; this can include correcting timecards, adding vacation time, closing payroll periods and more. Continue reading to find out how to add, configure and remove managers.
Note: Any user can be made a manager and given manager access; see the Overview of Users for more information.
Adding a Manager
To add a manager, follow these steps:
- Select Turn Administration On from the File menu.
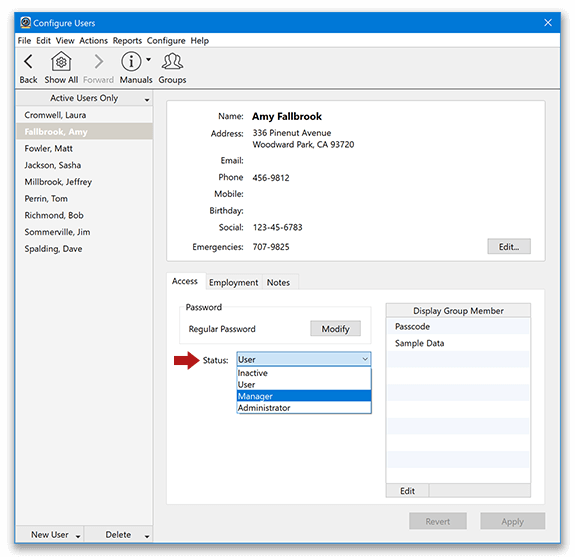
- Select Users from the Configure program menu.
- If the new manager is in the User list, select the user, otherwise click New User at the bottom of the user list to add a new user. Managers must have a password, so make sure a password is created.
- Select Manager from the Status pop-up menu. Click Apply to save.
Tracking Time
If a manager needs to clock in and out, you will need to add them to a display group. Click Edit in the Display Group Member box to add a manager to a group and allow them to punch time.
Assigning Manager Permissions
Once a manager is created, they need to be assigned to a particular group of users and configured with proper access and permissions. For a complete guide on setting up manager permissions, review the Managers and Manager Permissions article.
Testing Manager Access
Once the new manager has been created and given the proper access and permissions, it can be helpful to test their access by logging into the time clock as the manager. Network Edition managers will need to use a Pro Client to access administration mode. Select Turn Administration On from the File menu, choose the manager's name and enter their password. Review the settings and options available to the manager to ensure they have the proper access.
Note: Both administrators and managers use the Turn Administration On option, but manager access is limited by the configurations above.
Removing a Manager
To remove a manager, you will need to change their Status in the User configuration settings. To do this, select Turn Administration On from the File menu then select Users from the Configure menu. Select the manager and change their status from Manager to the desired status.
Note: To allow a manager to continue using the time clock give them User status. To remove a manager from time clock access completely, change their status to Inactive. For more information, read the Overview of Users, Managers and Administrators article.