Using Shifts in Reports
Virtual TimeClock makes it easy to track and display shift information, which would otherwise be difficult to obtain. You can view and sort data by shifts in Virtual TimeClock for job costing and budgeting purposes. Before you can view shift reports, you must first create a shift and then assign the shift to users by following these guides.
This article will cover how to configure and run reports that sort data by shifts. First, let's review the preconfigured reports of Virtual TimeClock:
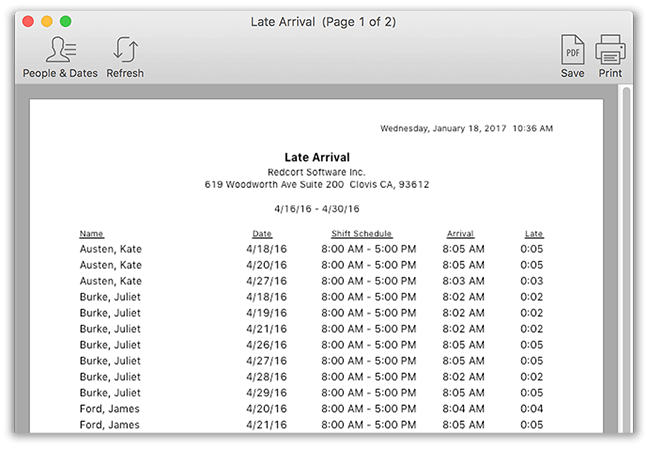
- Late Arrival : Provides a summary of late arrivals based on the time a user clocks in.
- Shift Detail : Provides a detailed report of all start and stop times of a shift.
- Shift Summary : Provides a high level summary of shifts and total hours worked for any period of time.
Running a Late Arrival Report
The Late Arrival Report is a helpful report for tracking late workers. Specific shift rules are not required to track late arrivals, as long as users are assigned to a shift. To run a Late Arrival Report follow these steps:
- Select Turn Administration On from the File menu.
- Select Late Arrival from the Reports program menu.
- The report will generate for users assigned a shift in the current period.
- To change the users and dates displayed, select the People & Dates icon and select the users and dates.
Note: This report is a built-in program report of the time clock, so no settings except the date range and users can be changed.
Shift Detail and Shift Summary Reports
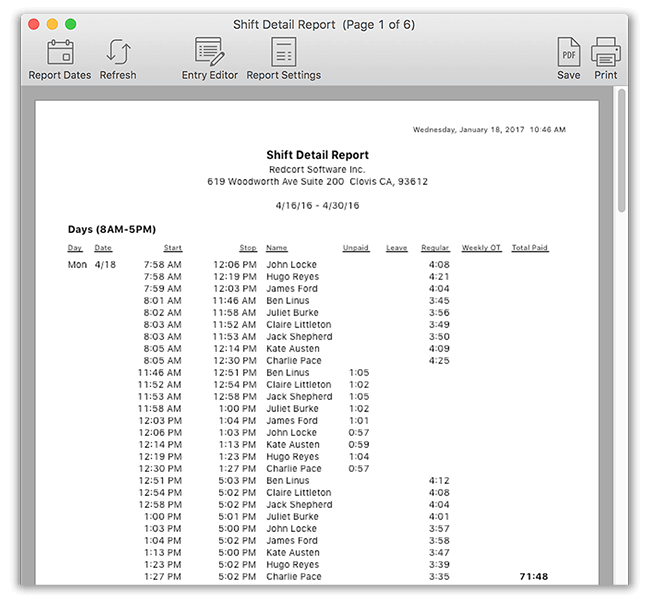
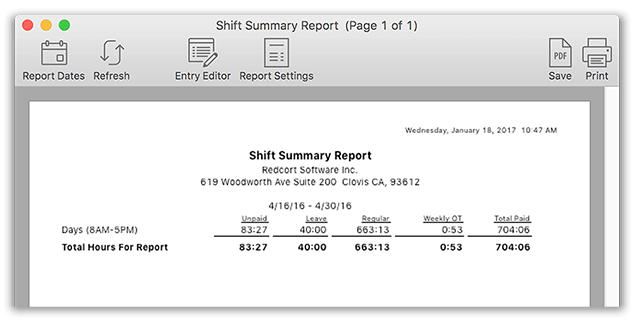
The Shift Detail and Shift Summary are built-in reports that sort time clock entries by shifts for easy viewing and analysis. The detail report shows all timecard entries for users with hours on a specific shift. The summary report provides a high level summary of all hours worked for each shift for a period of time. Changes can be made for these reports in the Report Writer window, which will be covered below. Follow these steps to run a shift report:
- Select Turn Administration On from the File menu.
- Select Shift Detail or Shift summary from the Reports menu.
Below is an example of a Shift Detail Report. This report includes information such as the date, the clock in/out times, worker names, and the type of work hour completed, such as unpaid or regular.
Below is an example of a Shift Summary Report. This report gives a high level view of hours and does not include worker names. This report is intended to show the total hours worked for the shift over a period of time, not who worked the hours.
Including Shifts on Other Reports
Shift Detail and Summary reports are great for tracking hours and looking at total hours spent for each shift, but they are not the only reports you can view shift information on. A Shift Summary can be included on some reports to show the total hours worked in a shift for a user. To include a Shift Summary on reports follow these steps:
- Select Turn Administration On from the File menu.
- Select Report Writer from the Configure menu.
- Choose the report you wish to add a shift summary to in the left column.
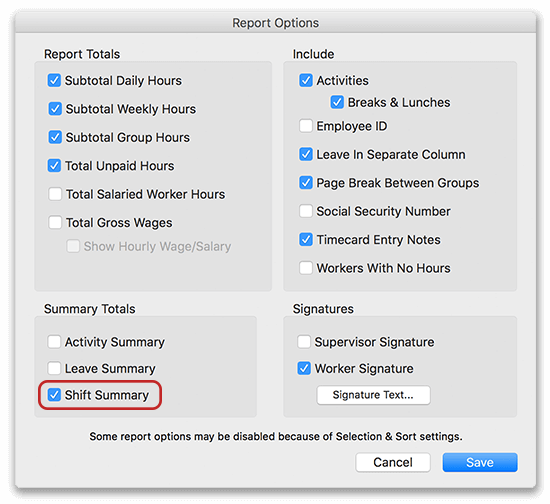
- Select Report Options and in the Summary Totals section click to check the box for Shift Summary.
- Save changes and select Preview Report in the toolbar.
Selecting Shifts Displayed on Reports
Reports can be customized to include all or selected shifts based on what you want displayed on your report. To change which shifts are included on reports follow these steps:
- Select Turn Administration On from the File menu.
- Select Report Writer from the Configure menu.
- Select the report in the left column and click Selection & Sort.
- In the Entries popup menu choose Selected Shifts.
- Click to check or uncheck shifts you want to be included on the report.
- Save changes and select the Preview Report icon to view the report.
Now you are familiar with the process of reporting shifts, you can always refer back to how to assign shifts.