Sending and Responding to Messages
The user-friendly Messaging feature of Virtual TimeClock is an excellent tool to allow your employees to communicate in a self-contained messaging system. If you're new to the Messaging feature, review the Overview of the Messaging Knowledge Base article.
Accessing Messages
Administrators & Managers: Administrators and managers can access the Messaging feature while in administration mode. Select Turn Administration On from the File menu and select the Messaging icon in the administrative toolbar on the In & Out Board.
- When a manager or administrator is logged into administration mode they will see a small red circle over the Messages icon in the toolbar if there are any new, unread messages.
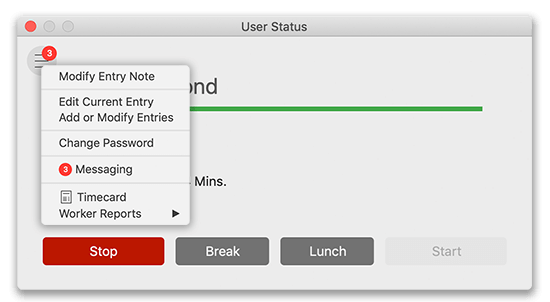
Users: Workers can access the messaging system by opening their user status and selecting Messaging from the options menu or right-clicking on their name on the In & Out Board and choosing Messaging. Employees can access their User Status by entering their PIN/passcode or selecting Messaging from the right-click User Action menu on the In & Out Board interface.
- Users will know they have a new message waiting for them when they open their user status window because there will be a red circle over the options menu with the number of unread messages they have.
- If your workers are using the In & Out Board, employees will see they have an unread message in the Msgs column. The number listed in the column signifies how many unread messages the user has.
Sending Messages
A message can be created and sent in a matter of seconds. Each message sent within Virtual TimeClock will be stamped with the date, time, and user, so you will know exactly when the message was sent and by whom. Follow the steps below to compose and send a message:
-
- With the Messages window open select New Message.
- Click anywhere in the To: row to select recipients.
- Cc and Bcc fields can be enabled and disabled by clicking on the Headers icon in the new message toolbar.
- Enter the subject line, and compose your message.
- Select the Send button in the top left corner.
Note: When messages are sent, they are automatically added to your sent mailbox.
Saving Drafts
When composing a new message, you have the option to save it as a draft, allowing you to finish and send it later. To save a draft:
-
- With a new message window open, select File from the menu bar and select Save.
- Alternatively, if you close the new message window without sending, you will be prompted with options to either Save, Don’t Save, or Cancel to return to your unsent message.
Note: Saved drafts are automatically stored in your drafts mailbox.
Opening Messages
In order to open a message in Virtual TimeClock follow the steps in the Accessing Messages section above. New and unread messages will be marked in bold with and unread indicator dot located to the left of the senders name.
Once a message has been opened, it can be marked as unread by right-clicking on the message and selecting Mark as Unread. With the Messages window open, double-click a message to open it or click to highlight the message and select the Open icon.
Responding to Messages
Workers can reply to the sender directly, reply to all recipients or forward the message to another user. Workers can choose either of these options by selecting the corresponding icon in the toolbar of the Messages window.
Creating Custom Mailboxes
Custom mailboxes can be created to allow users to group related messages. To create a custom mailbox:
-
- With the messaging window open, select File from the menu bar and select New Mailbox.
- Enter a name for the mailbox and click Save.
Note: Right-click a custom mailbox to access options to rename or delete it.
You can move messages to a custom mailbox by dragging and dropping them to the desired mailbox, or right-click a message and choose the destination mailbox from the ‘Move To’ option.