Manually Upgrade Virtual TimeClock
Older versions of Virtual TimeClock that are no longer supported (version 19 and older) must be manually upgraded. The following guide will help you easily upgrade any version of Virtual TimeClock to the latest release:
1. Determine Your Edition & Version
To determine which version and edition of Virtual TimeClock you are currently using:
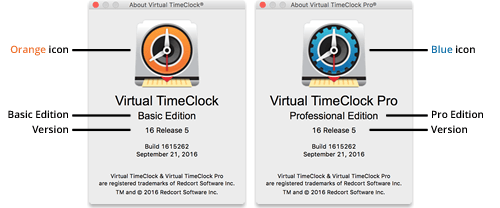
A. Launch Virtual TimeClock and open the About Virtual TimeClock dialog:
-
- Windows: Select the Help menu > About Virtual TimeClock
- Mac: Select the Virtual TimeClock menu > About Virtual TimeClock
-
- Version 14 or newer, notice the icon color: Basic = orange, Pro = blue, Network = green.
- Version 13 or older, use the program name to determine your edition.
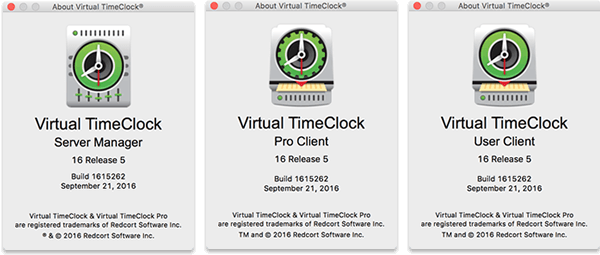
Virtual Network Edition is made up 3 different Virtual TimeClock programs. Launching either the Pro Client, User Client, or Server Manager will provide you will a dialog similar to one of the dialogs below. If you are using any of these programs, you are using the Network Edition.
2. Ensure You Have a Valid License Key
Next you'll need to determine of you'll need to purchase an upgrade:
A. If you are currently enrolled in Premier Support your current license key(s) will always upgrade to the latest Virtual TimeClock release.
B. Standard Support users must purchase an upgrade license. Request an upgrade price quote.
3. Uninstall Your Old Software
Review the Uninstall Guide for you Edition for step-by-step instructions on uninstalling your old software:
4. Install Your Upgrade Software
Install your Virtual TimeClock software upgrade using the Installation instructions for your edition:
Important Note: Your database will not open on a newer version until after a valid license key is entered.
5. Register Your Upgraded Software
After manually upgrading to a new version of Virtual TimeClock, you'll need to enter your license key(s):
-
- Launch the Virtual TimeClock software
- Select License Key from the Help menu
- Enter/Update your Company name and address to match your license
- Enter your license key(s).
Quit and restart Virtual TimeClock. Your database should automatically be updated and open. All prior program settings and preferences will be retained.
Upgrade Questions & Assistance
Contact us if you need help or assistance upgrading your Virtual TimeClock software. Our California based team is here to help!