Virtual TimeClock Knowledge Base
Quick Start – Virtual TimeClock Pro
This Quick Start guide will help you set up your time clock in 4 simple steps: add your employees, select a time clock interface, assign passwords and start punching in & out. This guide assumes you have already installed Virtual TimeClock Pro Edition.
Important Note: In Virtual TimeClock, User Mode allows employees to clock in/out and view their own timecard. Administration Mode allows you to modify entries, print payroll reports and access other administrative functions. You can Turn Administration On or Off from the File menu at any time. If you don't remember your administrator password, please contact Technical Support for assistance.
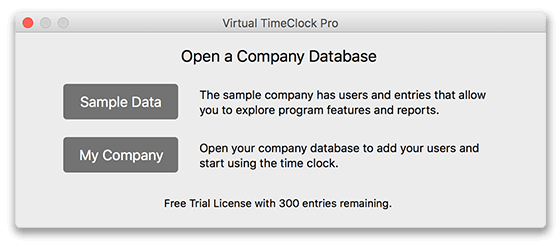
Open Your Company Database
- Using a free trial of Virtual TimeClock? Select My Company from the Open a Company Database window.
- Purchased a software license? Choose New from the Open a Company Database window to create a database and open it.
Note: If you're currently using the Sample Data, simply close the TimeClock, reopen the program and choose Open to start using your company database.
1. Add Users
When you open your company database, your first option will be to Add Users. Get started quickly by entering just the first and last names of your employees. If you close this prompt and return to the program later, review the Adding Users article.
Note: Free trials are limited to 300 time clock entries so we recommend limiting time clock use to 2 or 3 employees to get the most out of your trial.
2. Choose an Interface
The default time clock interface is the In & Out Board which displays a list of employees and their current status. If you do not want your employees to use the In & Out Board, review the TimeClock Interface Options article to find out how to use the PIN or Passcode interface instead.
3. Assign Passwords
Passwords can be used to help prevent buddy punching on the time clock. PIN and Passcode interfaces require passwords, while passwords are optional on the In & Out Board. Find out more by reading the Creating Passwords article.
4. Clocking In & Out
Now that your time clock is setup, it's time to have your employees start using the time clock. Select Turn Administration Off in the File menu to enter User Mode. Review the Clocking In & Out article for detailed steps on clocking in and out with each interface.
Congratulations, you are now up and running with Virtual TimeClock! To learn more about setting up overtime, leave tracking, activities and more, review the Pro Edition Setup Guide.