Virtual TimeClock Knowledge Base
TimeClock Interface Options
Virtual TimeClock includes several display options for the Pro and Network editions that can be customized for your company needs. Below you will find information on each of the display interfaces and how to configure them.
Note: Basic Edition only includes the In & Out Board interface.
To learn more about how these display interfaces work with full screen Kiosk Mode, review our Kiosk Mode Knowledge Base article.
How to Modify the Interface Settings
To access the interface options, follow these steps:
- Select Turn Administration On from the File menu.
- Choose Display Groups from the Configure menu.
- From the list on the left, select the group for which you want to change the interface.
- In Settings tab, select an interface from the Interface pop-up menu.
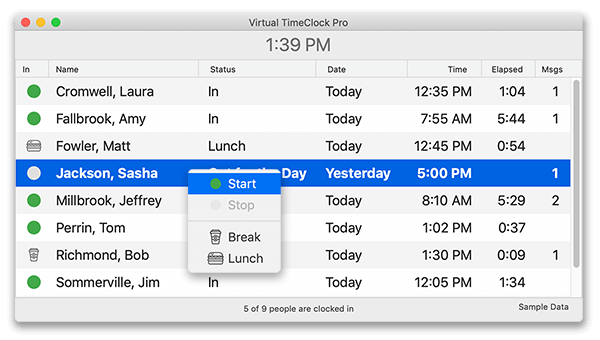
In & Out Board
This interface displays a list of employees and updates in real time showing the status of all users in the selected group throughout the day.
Note: Basic Edition users will select Security from the Configure menu and adjust In & Out Board settings in the Interface tab. For more information, review the Basic Edition Security article.
To view the In & Out Board options, select Options next to the interface popup menu.
- One or Two List Display Options: Employees can be listed in one or two lists depending on how you want to view employees. One List displays all users, but Two List displays the workers currently working in a separate column.
- Columns Displayed: The In & Out Board displays a variety of information that you may not want users to see, so you can choose which columns are displayed by checking/unchecking the boxes for the columns listed below.
- Show activity/status - This column displays a user's current status such as the worker is at lunch or out for the day. If activities or out memos are used they will be listed in this column.
- Show date - Date of the most recent clock in, out, or changed activity.
- Show time - The time of the most recent clock in, out, or changed activity.
- Show elapsed time - The time that has gone by since being clocked in for the current activity.
- Show new message count - This will show if a user has any unread messages in the software. A number will be listed if the user has any unread messages.
- Left Click: This setting allows you to choose what happens when a user left clicks their name. The Start/Stop menu will be displayed or the User Status window.
- Right Click: This setting allows you to choose if users see their User actions from the In/Out Board or if the right click does nothing.
PIN
The PIN (Personal Identification Number) interface requires employees to enter a unique PIN to use the time clock. To setup the PIN interface, you must first assign a unique PIN to each user in the display group. Select Users from the Configure menu and, for each user, choose the Modify or Create button under Password and enter a unique PIN. Learn more about Passwords.
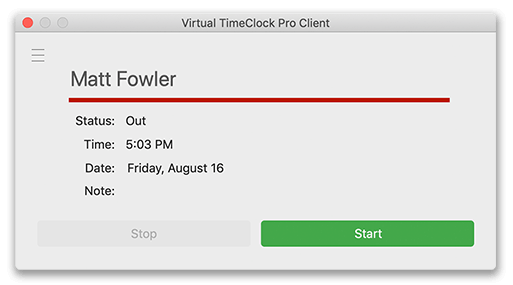
Note: Once a PIN is entered by a worker, the program will display that user's individualized time clock (as seen below). After punching in or out, the time clock will automatically log the current user out and wait for the next employee to enter their PIN.

Passcode
This interface functions exactly like the PIN interface above, but allows for standard alphanumeric passwords. To use the passcode interface, you must first assign a unique password to all the users in the display group. To do this, select Users from the Configure menu and, for each user, choose the Modify or Create button under Password and enter a unique password. Learn more about Passwords.

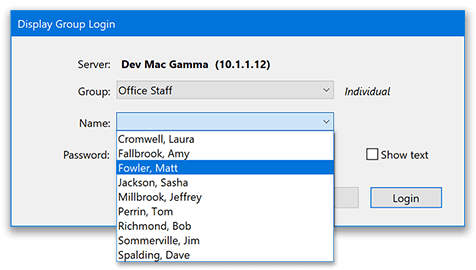
Individual (Network Edition)
The Individual interface is only available for the Network Edition and displays a simple, individualized time clock for a single employee. This interface is perfect for installing the time clock on individual workstations around the office.
After a display group is set to the Individual interface, you will complete a one-time display group login on each employee's computer. Once a computer is logged into the Individual interface, the time clock will only display that specific user's personal time clock. You can choose to require passwords in the group settings.
Note: The Individual interface does not include any access to coworker time clock information, making it a good option for preventing buddy punching.
For information on switching between display groups and how to login to a group, see the Changing Display Groups article.