Virtual TimeClock Knowledge Base
Managers & Manager Permissions
In Virtual TimeClock, Managers are users who are granted permission to access specific features of the time clock. Manager permissions are configured in the display groups options. If you are new to display groups, then we recommend you review our overview of display groups Knowledge Base article to understand how display groups work and how you can utilize them.
Note: For step-by-step instructions on adding a new manager, review this article.
Assign Managers to a Display Group
Managers are assigned at a group level, so if you have multiple groups make the necessary changes to each group. In addition, users can be assigned as managers to multiple groups and there can be an multiple managers for a display group. To assign users as managers of a group:
- Select Turn Administration On from the File menu.
- Select Display Groups from the Configure menu. Choose the group you want to add a manager to from the list of groups.
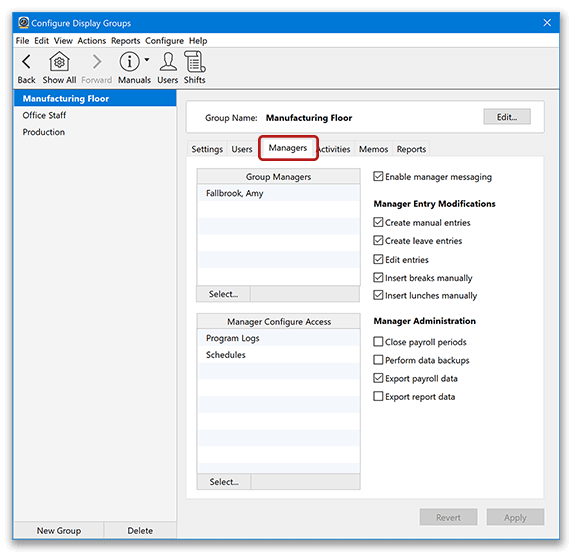
- Select the Managers tab and choose Select under Group Managers list.

- Select the group manager(s) from the list of available users.
- Click Save Changes to make selected user a group manager.
Note: Managers must have a password to log into administration mode. When they log into administration mode they will only have access to what the administrator has configured.
Modify Manager Permissions and Access
It's important to manually configure manager access to ensure they have the correct permissions and restrictions.
- Follow the steps above to select the right display group.
- Select the Managers tab and review the manager settings. See below for more information on each setting.
- Save any changes you make before leaving the Configure Display Groups window.
Messaging
The time clock has an internal messaging system that allows users, administrators, and managers to talk to others in the time clock. Messaging is enabled by default for managers, but it can be disabled by unchecking the box for Enable manager messaging. To learn more about this feature, review our Overview of Messaging Knowledge Base article.
Manager Entry Modifications
The Entry Modifications section is where you can assign permissions for managers to add or edit entries for users in the display group. If granted permission, managers can perform the actions by selecting the Entry Editor, Add Entry, or Add Leave icons in the toolbar of the In & Out Board when logged into administration mode. Any entry modification options enabled can be performed for entries in the current payroll period or for future dates.
Note: If an entry is added or modified by a user, manager, or administrator the entry will be annotated to the right of the report. There will be an ‘A’ to signify an entry was added or an ‘M’ for modified.
Administrative Functions
Managers can be granted additional access to administrative functions in the Manager Administration section.
- Close Payroll Periods: Managers can close a payroll period.
Note: Managers can only do this if they are a manager of a group that includes all time clock users, including themselves.
- Perform Data Backups: Grant permission to do a manual backup. Only available in Pro Edition.
- Export Payroll Data: Managers can export payroll data for past payroll periods from the Payroll Approval window.
- Export Report Data: Managers can export data for all reports they have access to for current and past payroll periods.
Access to Features
Managers can be granted permission to access and edit time clock settings in the Manager Configure Access section. For example you may want to allow managers to add leave awards or activities for their users, but not be able to edit overtime rules or edit report settings.
- Follow the steps at the top of this article if you are not already in the Managers tab of the Configure Display Groups window.
- Click Select in the Manager Configure Access section and check any settings you want manager(s) to have access to.
- Select Save Changes.