Virtual TimeClock Knowledge Base
Assigning a Static IP Address
A network IP (Internet Protocol) address is assigned to each device on a computer network. This address is like your street address in that it provides a known, reliable, and uniquely assigned destination for all communication for a device on the network. This makes possible things like printing, file storage and Internet access. IP addresses normally consist of numbers separated by dots, for example 192.168.1.100.
Static vs. Dynamic IP Addresses
A network IP address may be assigned statically or dynamically:
- A Static IP address is manually assigned at the computer (or device). Static IP addresses never change.
- A Dynamic IP address (or DHCP) is assigned and centrally managed by hardware on the network, usually a router. A computer or device is not permanent (static) and can be dynamically reassigned a new address at any time for a number of reasons.
Dynamic IP addresses are widely used to simplify network management and prevent duplicate addresses. This can be compared to the post office assigning our street address and zip code rather than allowing each business and homeowner to decide what their own address will be.
Virtual TimeClock & Static IP Addresses
Virtual TimeClock Network Edition is designed to communicate with multiple computers on a network in what is know as a client-server environment. All computers running the TimeClock client application connect to a single computer (designated the server) that is running the TimeClock Server application. The TimeClock Server manages user access and stores the data for all the clients.
The clients need to consistently find the server computer so the server must be assigned a static IP address that does not change. If the TimeClock Server has a dynamic IP address, the TimeClock clients will lose their ability to connect to the server whenever the server's address changes.
Note: Communication is initiated one way (from client to server) so computers running Virtual TimeClock Client software do not need a static IP address.
Setting a Static IP for a TimeClock Server
While assigning a static IP address is relatively simple, it alters the computer's presence on the network. You must ensure the address is valid for the network and that it does not conflict with other devices or the addresses reserved for a DHCP server that may be running on your network. If you are unfamiliar with these terms and your network environment you should rely on a IT professional to set a static IP address for you.
Below you will find steps for assigning a static IP address on both Windows and macOS computers.
Microsoft Windows 7, 8,10, & 11
Follow these steps to assign a static IP address to your TimeClock Server computer:
- Open your Virtual TimeClock Server Manager and select Stop Service from the File menu.
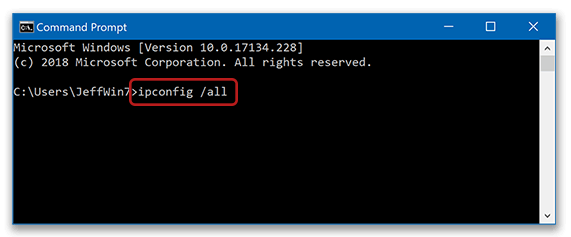
- Click the Windows Start button, type command prompt and select the Command Prompt.
- In the Command Prompt window, type ipconfig /all and press Enter.
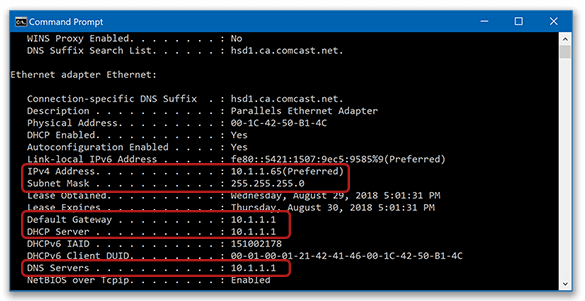
- Locate your network adapter and note the following information: IPv4 Address, Subnet Mask, Default Gateway, DHCP Server and DNS Servers.
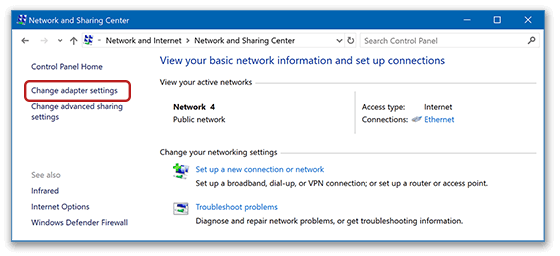
- Open Control Panel and select Network and Internet, then select Network and Sharing Center.
- Select Change adapter settings from the left side navigation.
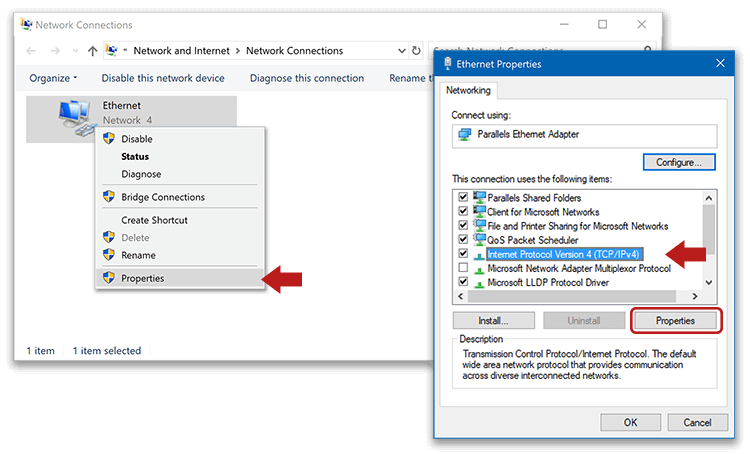
- Right-click the current network connection and choose Properties (see image below).
Note: Whenever possible, use a wired, ethernet connection for the TimeClock Server computer.
- Select Internet Protocol Version 4 (TCP/IPv4) and click the Properties button.
- Select Use the Following IP Address and follow the instructions below.
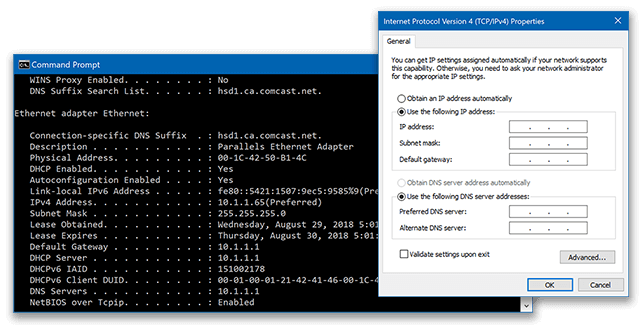
Locate your current IPv4 Address from the Command Prompt window. Notice that IP addresses are made up of 4 sets of numbers separated by dots. Your new IP address should match your current IPv4 address exactly, except for the last set of numbers.
Change the last set of numbers to an unassigned number outside of your DHCP range. You can find your DHCP range by logging into your Internet router and reviewing the DHCP range in your LAN settings. A generally address is a number between 225 and 254. After the static IP Address is set, copy the Subnet Mask, Default Gateway and DNS Servers from the Command Prompt window in Step 4.
Note: If you only have one DNS Server address in the Command Prompt, choose a common DNS server for the Alternate, like Google's DNS server: 8.8.8.8
- Check the box to Validate settings upon exit. Click OK to save settings.
- Open your TimeClock Server Manager and select Start Service from the File menu.
Apple macOS (Monterey 12 and older)
Follow these steps to assign a static IP to your TimeClock Server computer:
- Open the TimeClock Server Manager and select Stop Daemon from the File menu.
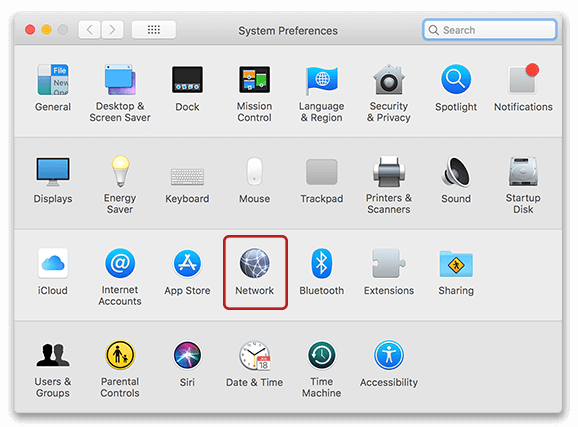
- Select System Preferences from the Apple menu and choose Network.
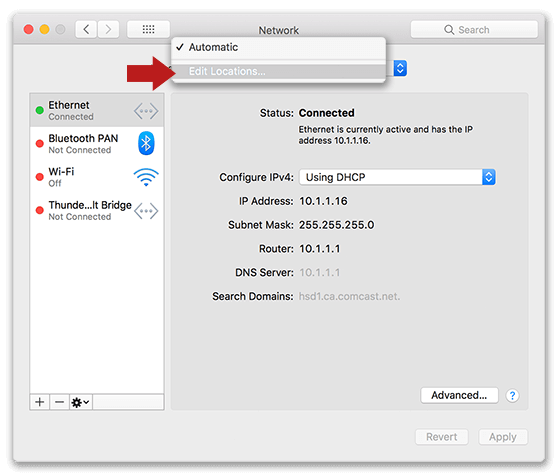
- Note the current network connection and the IP Address.
- In the Locations pop up menu, select Edit Locations.
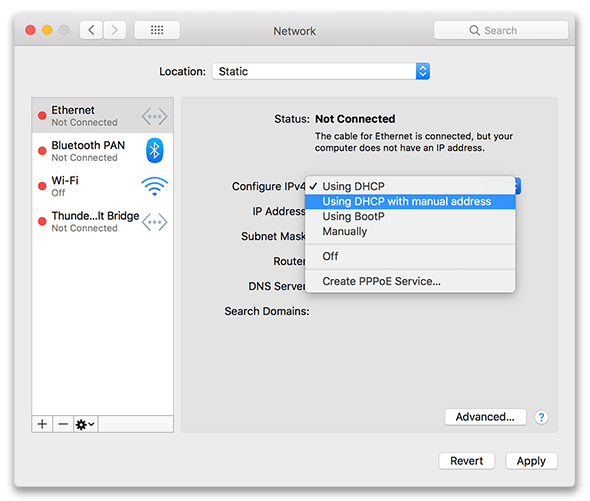
- Choose the "+" button, name the location "Static" and click Done.
- With the new location selected, choose the proper network connection.
Note: Whenever possible, use a wired ethernet connection for the TimeClock Server computer.
- Select Using DHCP with manual address from the Configure IPv4 menu.
- Enter the new manual IP address in the IP Address field and click Apply.
Important: IP addresses are made up of 4 sets of numbers separated by dots. Your new IP address should match the IP address from Step 3 exactly, except for the last set of numbers. Change the last set of numbers to an unassigned number outside of your DHCP range. A safe rule of thumb is to choose a number between 225 and 254.
- Open your TimeClock Server Manager and select Start Daemon from the File menu.
Apple macOS (Ventura 13 and newer)
Follow these steps to assign a static IP to your TimeClock Server computer:
- Open your TimeClock Server Manager and select Stop Daemon from the File menu.
- Select System Settings from the Apple menu and choose Network.
- Select Ethernet from list of Network adapters.
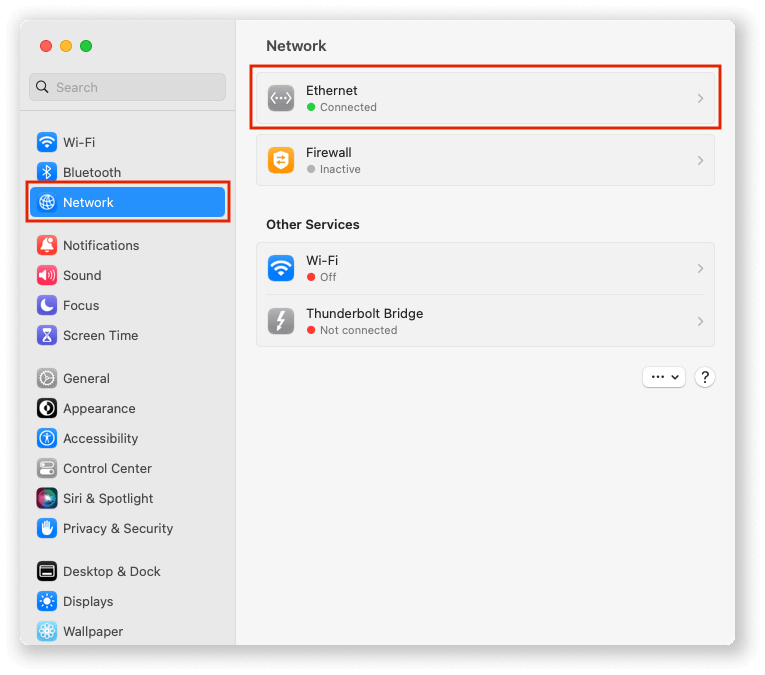
- Note the current network connection and the IP address listed in the Ethernet menu.
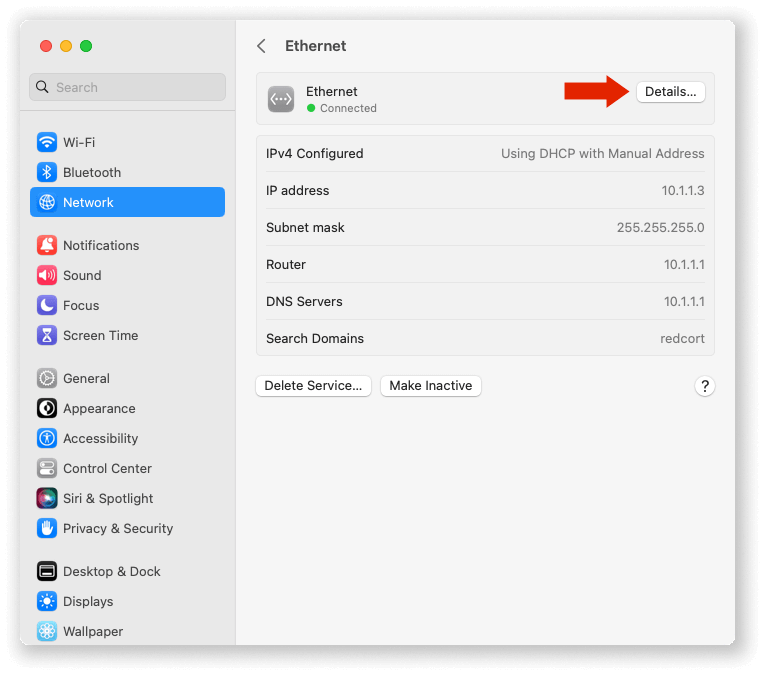
- Select Details from the upper right-hand corner.
- In the Ethernet pop up window if you are not currently using DHCP then you will need to change this setting by selecting Using DHCP with manual address from the Configure IPv4 menu.
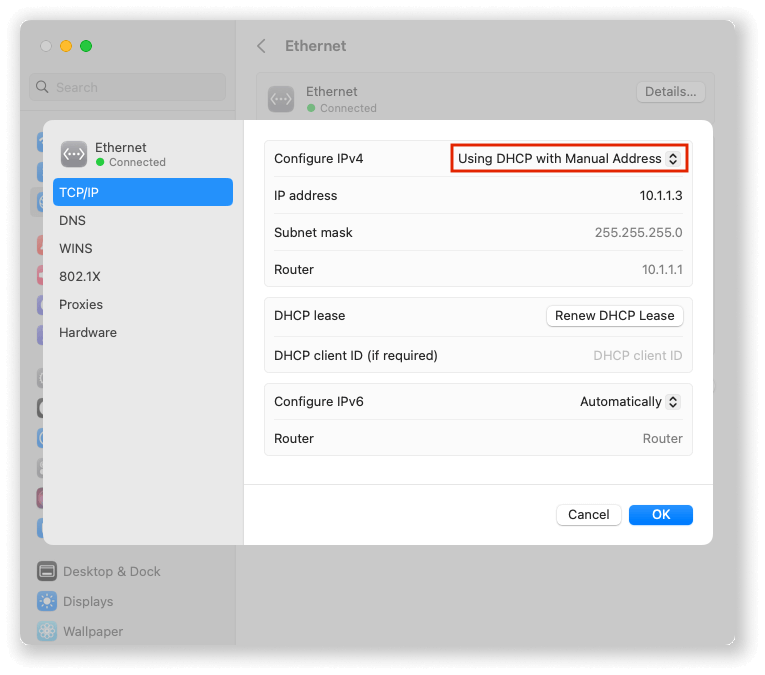
- Enter the new manual IP address in the IP Address field and click OK.
-
- Important: IP addresses are made up of 4 sets of numbers separated by dots. Your new IP address should match the IP address from Step 4 exactly, except for the last set of numbers. Change the last set of numbers to an unassigned number outside of your DHCP range. It is generally safe rule to choose a number between 225 and 254.
-
- Open your TimeClock Server Manager and select Start Daemon from the File menu.