Virtual TimeClock Knowledge Base
Setting Up Leave Awards
Virtual TimeClock gives you the ability to create customized leave awards for each employee by leave category. You must setup leave categories relevant to your company before assigning leave awards to users.
To Assign Leave Awards:
- Select Turn Administration On from the File menu and enter your password (if required).
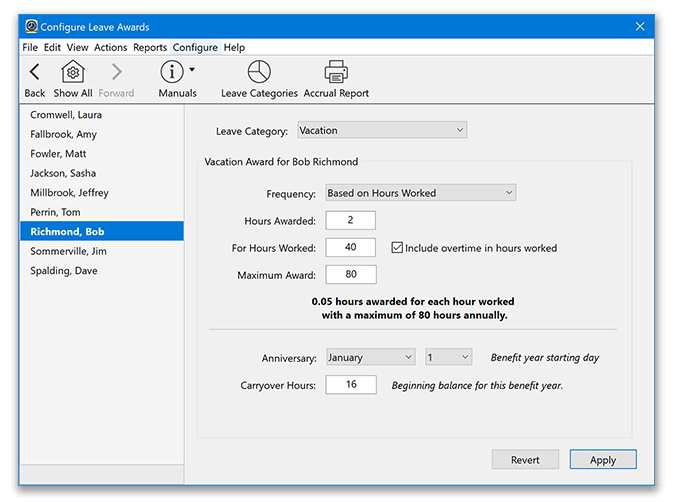
- Select Leave Awards from the Configure menu to open the Configure Leave Awards Window. By default all employee leave awards will be set to “No Award”
- Select a user by clicking their name on the left side of the window.
- Choose the desired Leave Category from the drop down menu.
- Enter the leave award details: frequency, hours per year, anniversary date, and carryover hours. Keep reading for detailed information on the award settings.
- Once you are finished, click Apply to save your changes.
Note: Since leave awards are specific to each user (and each leave category) this process must be repeated for each leave type and each user.
- After setting up Leave Awards you can learn how to enter leave hours for your employees. Learn how to enter leave hours >
Understand Leave Award Settings
Here are some important pieces of information that will aid you in setting up your leave awards:
Anniversary Dates
The anniversary date defines the beginning of the benefit year. Each leave award can have its own unique anniversary day for tracking benefit years. Common choices include: January 1, employee hire dates, or the end of a probationary period.
Note: For new employees, the anniversary date marks the start of leave accrual. This is often different than the hire date.
Award Frequency
There are four available options for leave award frequency:
- Daily: Awards are accrued based on the number of calendar days in the benefit year. Accrual rate is calculated by dividing the yearly award by 365.
- Monthly: Awards are accrued based on how many months the employee has worked since the beginning of the benefit year. Accrual rate is calculated by dividing the yearly award 12.
Note: Monthly awards require that the benefit year begin on the first day of a month and leave is always awarded at the end of each full month.
- Yearly Award: This is a lump sum that is awarded to the user at the beginning of the benefit year. This means the full balance is available for immediate use.
- Based on Hours Worked: Awards are accrued based on the total hours worked in the benefit year. A maximum award option is available for limiting how much leave a user can accrue. By default overtime hours are not included in this accrual, but a checkbox for this option can be selected as part of the award. When leave accrual is based on hours worked, employees have to actually record work hours before any leave hours are accrued and available to be used.
Note: When accruing leave benefits based on hours worked, users cannot earn more leave hours by taking paid leave.
Hours Per Year
This award is always entered as a total amount for the benefit year. The hours per year award frequency will automatically be calculated and displayed next to the entry area. For example, if the total hours for the year is 48, awarded monthly, then the program will automatically award 4 hours per month.
Carryover Hours
Carryover hours are from the previous benefit year. They can be either positive or negative, depending on the employee’s current leave balance. These must be reassessed and manually entered at the start of each benefit year. Virtual TimeClock currently does not support automatic leave carryover. Carryover hours for the current benefit year can be viewed at any time using the Accrued and Used Leave Report. Click to learn how to carryover unused leave hours to the new benefit year.
Paid Leave & Overtime Calculations
By default, Virtual TimeClock does not include paid leave in overtime calculations. If your business policies require leave to be included in overtime calculations, this setting can be changed in the Time Settings configuration area. To do this, follow the steps below.
- Select Turn Administration On from the File menu.
- Choose Time Settings in the Configure menu.
- Check the option for Include paid leave in weekly overtime calculations.
- Click Apply to save changes.